I spend many many hours writing and editing for both pleasure and as part of my monthly tasks on Barking Irons Online and Orcs in the Webbe (which if I'm honest I really enjoy so they're pleasure too). I also like converting games for use with virtual tabletop software (like the awesome Battlegrounds). The one thing I don't seem to do much of is actually playing the damned games I write and create. Well, thanks to this blog, that stops now. One of the reasons I started it was to make me think about what takes up my time. The posts themselves are written mainly on the bus so there's not much time lost there. This evening Ems is staying over down in London (one of the perils of being a lawyer in a city hundreds of miles away from home) so I am going to play a game...
Firefight 2.0: Episode 01 "Getting Going"
Sounds simple doesn't it, but what to play? Something I know the rules to? something new? something digital? something out of a box? All have pros and cons. It's decided that when I get in I intend to game. I shall give it some thought, but not too much, five minutes after I'm in I want to be playing a damned game...
(incidentally I did realised trying to cram Action Cards, Virtual Table Top (VTT) Software and Boxed Game ethics into one blog post was a bit much. Today's post is about the game. Yep, I've used Battlegrounds to play it but this post is about the game (and maybe a teeny bit about the Action Cards). A bigger, shiny VTT post is coming soon, don't you worry...)
*Thirty or so minutes later*
Well, I made it in and decided to give Firefight a whirl. I know I haven't finished my FF2.1 training gamebook yet but I did manage to finish off making my Action Cards. So I'm going to play the first FF2.0 scenario in the rulebook, Getting Going, using Bob Minadeo's cracking solo rules which can be found on Barking Irons here.
And so it begins...
A simple grudge match between two sets of four Muster, for ease of play called Red and Blue. I took control of the Blue and gave the Red's over to the solitaire rules.
Turn One

Event: 2 Spades - No event
Initiative: Red 5 vs Blue 1 - Red's Go First
I rolled a D4 to choose which order to activate the red miniatures. I've cut and pasted bits from the solo rules to show what each character gets up to.
Red 3 - 5 of Diamonds (Discretion) - A figure that is already behind the furthest available cover on the battleground will Stay Frosty instead of Moving, firing on the first enemy to spend a General dice within LOS and weapon range.
Red 3 - Tactical Option: Stay Frosty
Red 1 - Ace of Clubs (Willingness to Wait) - If there is no enemy figure in LOS within the distance indicated by the card the figure will default to a Stay Frosty action, firing on the first enemy to spend a General dice within LOS and weapon range.
Red 1 - Tactical Option: Stay Frosty
I worked out which squares would trigger opportunity fire and marked them on the map. This helped in the solo game so I didn't miss anything.

Red 2 - 10 of Diamonds (Discretion) - Move and Fire action if an enemy figure is in LOS within the distance indicated by the card. Any movement will be used to move away from any enemy figures only if the figure can end its move in hard or better cover.
Red 2 - Move & Fire @ Blue 4 - 5,2,3 - No TARGETs - Stays in place
B4 has to activate next as survived attack.
Blue 4 Move & Fire @ Red 2 - 3,5,6 - One TARGET - Moves 2 squares
Red 2 - Is Turn Done so can only use Tactical Response: Armour
Response: Armour - 2 - No DODGEs
Dead!
Well, that went well :)

Red 4 - 3 of Spades (Intent to Harm) - If there is no enemy figure within the distance indicated by the card the figure will default to a Move action. The figure will move as close to the nearest enemy as it can. The figure will end its move in the best cover it can reach given its objective of closing with the enemy, this means it can end up in the open if no cover is available.
Red 4 - Move - 6,5,1,2 - Moved 3 Squares

My go... Not many places I can go without triggering Opp Fire. Going to go for a move action with Blue 1.
Blue 1 - Move - 1,1,4,4
Actually checking cover rules I'm pretty sure he can hit me... (edit: Actually think I got this wrong but hey ho)

Okay, so, checking the Opportunity Fire rule card.
Red 3 - Opportunity Fire @ Blue 1 - 1,6 - One TARGET
Blue 1 has already rolled two Dodge's though so TARGET is negated.
A question arose: I'm not sure if one of my Move Action Dice had been a TARGET could I have Opp Fired back ? I, at that point, did not have a Turn Done marker... Hopefully one of the writers will let me know :)
Blue 2 (Emeritas Hughes no less) - Move & Fire @ Red 3 - 1,4,2 - Moves 2
I changed to mini numbers here so I could place them on the squares with the character and also replaced the Turn Done on Blue 4 and reduced the Dice Pool, just in case you were wandering why it's different.
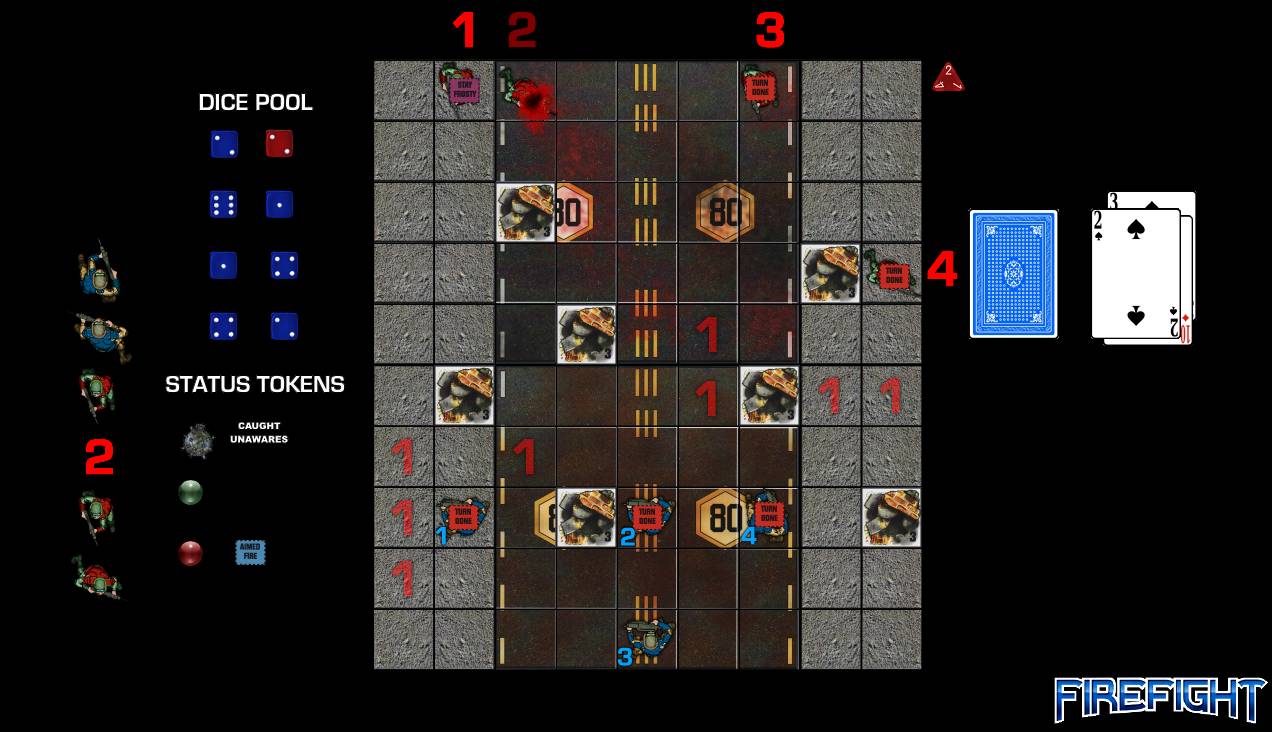
Blue 3 - Move - 6,6,5,4 - Moved four squares
Decided to risk it and stick him in the open as hitting is hard. Fingers crossed...

Removed all status tokens and tokens showing Opp Fire squares for AI and made # tokens for red smaller too.
Turn Two
Initiative - Red 4 - Blue 2 - Red's Win
Event: No Event
Roll D4 to select which red to actiuvate, re-roll on a 2
Red 1 - Queen of Hearts (Measured Approach) - If drawn as an action card, a picture card indicates the figure will fire at the closest enemy in LOS and within weapon range regardless of distance or chance to hit. Suit will indicate the specific action used to make the attack. A figure drawing hearts will use a Move and Fire action. Any movement from this action will only be used if the figure can end its move in soft or better cover.
Red 1 - Move & Fire @ Blue 3 - 3,1,5 - Moves 2, No TARGETS
B3 has to activate next as survived attack.
Red 1 in Hard Cover from Blue 3's viewpoint.
Blue 3 - Aimed Fire @ R1 - 5,2,2 - One TARGET
Red 1 - Is Turn Done so can only use Tactical Response: Armour
Response: Armour - 1,2
DODGE negates TARGET
Red 3 - 6 of Diamonds (Discretion) - A figure that is already behind the furthest available cover on the battleground will Stay Frosty instead of Moving, firing on the first enemy to spend a General dice within LOS and weapon range.
Wow, Red 3 has a massive view of the battlefield. I've put translucent 3's to show the squares that trigger Opp Fire again.
Red 4 - 7 of Hearts - (Measured Approach) - A figure drawing hearts will use a Move and Fire action if an enemy figure is in LOS within the distance indicated by the card. Any movement from this action will only be used if the figure can end its move in soft or better cover.
Red 4 - Move & Fire @ Blue 4 - 1,3,4 - Moves 2 squares - No TARGETs
Blue 4 has to activate next as survived attack.
Blue 4 - Aimed Fire @ Red 1 - 3,6,2 - One TARGET !
Red 1 - Is Turn Done so can only use Tactical Response: Armour
Response: Armour - 1,6
DODGE negates TARGET

Blue 2 is going to Aim as that doesn't use a GENERAL dice so won't trigger Opp Fire (I think)
Blue 1 - Aimed Fire @ Red 3 - 4,2,4 - No TARGETS
Blue 1 - Move (nothing in LOS so no choice) - 6,2,5,6 - Moves into a Red 3 Opp Fire Square
Red 3 - Opportunity Fire @ Blue 1 - 2,5,5 - No effect
End of Turn Two !

Turn Three
Initiative: Reds 5, Blue 3 - Red Wins
Event: Queen of Spades: Artillery Barrage!
There is no such thing as “friendly fire”. One side or the other has mistakenly landed a barrage in your battle ground. Roll 1d6 for each figure in play, friend and enemy both. Any figures rolling a 6 are killed and removed from play. Roll 1d6 for each terrain item in play. Any terrain item rolling a 6 is destroyed just as if it had failed to dodge a hit from a heavy weapon. All figures are now marked “Turn Done” and play proceeds to the following turn’s Random Event phase.
There is no such thing as “friendly fire”. One side or the other has mistakenly landed a barrage in your battle ground. Roll 1d6 for each figure in play, friend and enemy both. Any figures rolling a 6 are killed and removed from play. Roll 1d6 for each terrain item in play. Any terrain item rolling a 6 is destroyed just as if it had failed to dodge a hit from a heavy weapon. All figures are now marked “Turn Done” and play proceeds to the following turn’s Random Event phase.
R1 - 6 - DEAD!
B1 - 1
B2 - 6 - DEAD!
R3 - 6 - DEAD!
B3 - 3
R4 - 3
B4 - 4
All terrain is fine.
Bugger me. That was an eventfull turn.Emeritas Hughes (being the hero of the piece) has been stablised and rushed to hospital... He will live to fight another day! Faceless Red dudes not so lucky.

Turn Four

Initiative: R5, B4 - Re-roll
Initiative: R3, B5 - Blue goes first!
Event: 9s - No Event
Blue 1 - Aimed Fire @ Red 4 - 1,4,2 - Missed
Red 4 has to activate next as survived attack.
Red 4 - Queen of Hearts (Measured Approach) - If drawn as an action card, a picture card indicates the figure will fire at the closest enemy in LOS and within weapon range regardless of distance or chance to hit. Suit will indicate the specific action used to make the attack.A figure drawing hearts will use a Move and Fire action if an enemy figure.
Red 4 - Move & Fire @ Blue 1 - 1,6,2 - One TARGET, One DODGE
Blue 1 - Is Turn Done so can only use Tactical Response: Armour
Response: Armour - 2,4
No DODGEs - Dead!
Blue 4 - Assault Fire (as cannot see R4, don't fancy my chances as need two TARGETS to hit but might as well give it a go) @ R4 - 4,5,5 - No TARGETs
Time to close the net, no point assaulting as it's really hard with so few dice and no re-rolls. Next turn one or the other should get a clear shot. Might even win initiative next turn..
Blue 3 - Move - 1,6,5,3 - Moves three squares.
End of Turn

Turn Five
Initiative: R4, B3
Argh ! Red's going to get a shot in (although it depends on thier action card.) Is there an event...
Event: 8 of Clubs - No Event
Whew!
Red 4 - 6 of Clubs (Willingness to Wait) - A figure drawing clubs will use a Move and Fire action if an enemy figure is in LOS within the distance indicated by the card. Any movement from this action will only be used if the figure can end its move in hard or better cover.
Red 4 - Move & Fire @ Blue 4 - 2,3,6 - One TARGET
Blue 4 - Tactical Response: Running for Cover - 2,3,5,6 - No DODGEs ! Dead !
Blue 3 - His squad decimated tries to end it...
Blue 3 - Aimed Fire @ Red 4 - 2,2,5 - One TARGET
Red 4 - Is Turn Done so can only use Tactical Response: Armour
Response: Armour - 4,2
No DODGEs - Dead!
GAME OVER MAN! GAME OVER!

I really enjoyed the game. The solo mechanics work really well, it was pretty close. I am crap at anything tactical but it felt like the opponent was reacting to my actions.
That random event took me a bit by surprise, Bloody hell, wiping out three characters, including Emeritas Hughes! It's so long since I uploaded the article onto Barking Irons I'd pretty much forgotten how powerful some of them are. It made the start of every turn after really tense, just in case something else cataclysmic happened. The solo rules would work for a number of Sci Fi skirmish wargames. I'm thinking about compiling a list of event cards for different settings for use in FF2.0 (jungle, underwater, spaceship etc). A quick web search shows most of the work has been done already, just a case of finding twelve I like the sound of for each setting and jotting down the game effects.
Modesty can jog on, my Action Cards performed brilliantly! Every turn was really smooth with no referencing the rulebook required at all. No melee was forthcoming, but that's because I think it's really hard to actually hit someone as a preliminary 'focus' roll is needed before rolling to hit. More powerful characters with higher dice totals and re-rolls wouldn't have as much difficulty.
I will definitely be playing FF2.0 again in the near future, I can't stress how smooth the mechanics felt as I played the scenario.
C.


